Inline inspection in industrial processes where parts move continuously in a production line is increasingly becoming an indispensable tool for industrial quality inspection. Researchers at AIT are implementing this, for example, in high-performance steel products or banknotes.
Modern production systems are characterized by high speeds coupled with high quality demands. This places the highest demands on quality control. The most important non-destructive method for inspection is the automatic processing and evaluation of images taken with cameras directly in production. Both two-dimensional and three-dimensional methods are used; in the latter - similar to spatial vision in humans - several images from different camera positions are computationally linked.
Researchers at the AIT Austrian Institute of Technology - Austria's largest Research & Technology Organization (RTO) - have been working on such modern methods of inline computational imaging (ICI) for many years. For example, they have developed a sensor that enables simultaneous 2D and 3D inspection of moving objects. "In combination with intelligent algorithms, the AIT-ICI technology enables a new dimension of fast and precise inline inspection. We can offer our industrial partners holistic solutions - that is, from (optical) sensors that record the data to algorithms that independently decide, for example, whether or not it is a surface defect," explains Andreas Vrabl, head of the AIT Center for Vision, Automation & Control (VAC).

© AIT
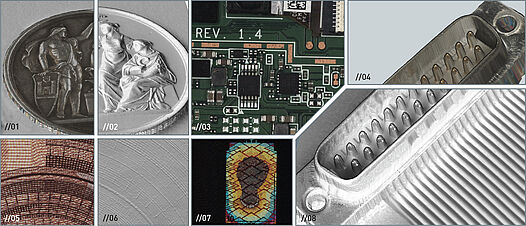
Test-Inline computational imaging methods can be used to visualize and measure the finest structures on surfaces of a wide variety of objects. In the picture some application examples: 3D image with texture (01) and precise 3D reconstruction (02) of a coin; all-in-focus color image of a printed circuit board (03); 3D image with texture (04) and precise 3D reconstruction (08) of a connector; color image (05), gravure (06) and hologram (07) of a 10 Euro banknote.
Modern imaging techniques
An important functional principle behind this is a combination of two different imaging methods: Photometry and Light Field. Stereo photometry uses images of the object with different illumination directions: It calculates local surface curvatures from the shading gradients and has its strengths in the reconstruction of fine surface details such as irregularities, embossing, scratches or pores. The light field technique, on the other hand, uses images from different viewing angles. It is particularly good at determining the height profile for textured areas, but fails for areas with homogeneous or glossy surfaces, as well as fine surface details.
Inline Computational Imaging combines the two methods in a compact hardware setup. The sensor head consists of a matrix camera and two or more light lines. The hardware is fixed in place while the object passes under the camera on a conveyor belt. In this way, ICI mimics the approach of a human who, when inspecting a shiny surface, intuitively varies the viewing and illumination angles to detect even the smallest defects.
As the object passes under the sensor (camera and illumination), the direction of illumination is varied and images are continuously captured. Each individual image thereby images the object at a slightly different viewing and illumination angle. "The combination of the two methods makes ICI largely independent of the surface properties of the test objects," explains Markus Clabian, Head of Competence Unit High-Performance Vision Systems at AIT.
Stainless steel billet testing
A good example of this is a cooperation project between AIT and voestalpine BÖHLER Edelstahl GmbH & Co KG. This company produces high-performance steels and nickel-based alloys for the international aviation, automotive and oil & gas industries. An intermediate product in the production of stainless steel products are so-called "billets" - these have a square cross-section and are rolled for further processing. It is crucial for the quality of the end products that the rolled billets do not have any defects on their surface, such as slag inclusions or cracks. These would enlarge during rolling and impair the properties of the end products.
If such a defect is detected on the surface, the billet is ground further until the surface is flawless. The optimum grinding treatment and the number of grinding passes required are currently decided by employees:inside who visually scan the surface for defects. "Only those with a trained eye and many years of experience can recognize slag inclusions or distinguish the finest cracks in the steel from grinding marks," reports AIT researcher Petra Thanner. Together with experts at voestalpine Böhler Edelstahl in Kapfenberg, work has been carried out in recent years on an automated process for detecting surface defects in rolling billets. The task is further complicated by the fact that billet surfaces are differently colored and curved depending on the grinding conditions, that the steel surface can be very shiny (which makes camera images difficult to evaluate) and that the inspection has to be carried out directly in the harsh production environment of the rolling mill. "Many an attempt to automate this time-consuming process has failed in recent years due to this plethora of different challenges," reports Siegfried Kleber, head of the process development group at voestalpine Böhler Edelstahl.
Nevertheless, it has now been possible to develop an innovative testing method and bring it to industrial maturity. In this process, a camera is permanently installed above a test object that is moving underneath. The scene is illuminated from four different directions; these are selected so that the difference between cracks and normal grinding marks stands out as clearly as possible. The raw camera images, on which the defects each have different shadow effects, are further processed in the next step using photometric methods: In this process, in addition to detailed and high-contrast 2D images, an exact 3D model of the surface is also calculated, in which surface defects become even more clearly visible.
Artificial intelligence detects cracks
Artificial intelligence (AI) methods are used to classify these structures either as normal grinding marks or as defects: An artificial neural network was trained with countless camera images that had previously been manually marked as to which type of surface structure was involved. The AI system learned to reliably detect unwanted defects and to color-code them in the camera images. "The main advantage of our system is that the moving object is recorded with just one camera at several viewing angles and this data is intelligently linked," Markus Clabian summarizes.
The inspection system developed by AIT has now been implemented as a pilot system at voestalpine BÖHLER Edelstahl: In a compact housing that protects the sensors and electronics from the harsh environmental conditions, it inspects the surfaces of the four billet sides directly next to the grinding chamber with an accuracy of 50 micrometers at a speed of 24 meters per minute.
The results are clearly displayed on a screen. With the help of this assistance system, the operators no longer have to leave the test stand for the time-consuming visual inspection. This not only makes the work easier for the people concerned, but also enables better utilization of the machines, as there is now no need to shut down the grinding system during the inspection work. "The employees were already heavily involved in the development and are now in the process of using and further developing the system," reports Plant Manager Peter Markiewicz.

© AIT/Test Banknote with kind permission of the OEBS
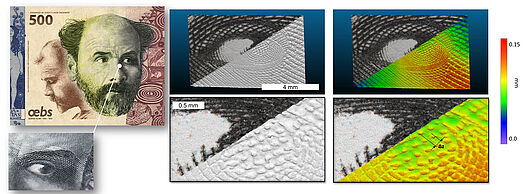
Test-The results of the scan of a test banknote bearing the likeness of the painter Gustav Klimt, provided by Oesterreichische Banknoten und Sicherheitsdruck GmbH (OEBS): For example, the intaglio print on the eyeball is clearly visible at a measured depth of 57 µm.
Smallest details, very big
Another area of application for modern ICI technologies is the inspection of banknotes: Here, technologies from AIT have been among the world leaders for many years in inspecting used banknotes for contamination, signs of wear or even counterfeiting. The methods are constantly being refined: now a microscopy system has been developed that combines light field and photometry methods with special projection optics to create a parallax effect: to calculate a stereoscopic 3D topology, a series of images is taken as an object is moved through the camera's field of view. Together with innovative image processing algorithms, the system delivers high-resolution 3D images at high speeds. In the case of banknotes, inspection speeds of 12 mm/s can be achieved at a depth resolution of 2.8 μm and a lateral scan of 700 nm/pixel - which is suitable for inspection in the high-precision manufacturing industry.
How well this system works in practice was demonstrated in two use cases during a project together with OEBS (Oesterreichische Banknoten und Sicherheitsdruck GmbH), a 100 percent subsidiary of Oesterreichische Nationalbank. First, a test printing plate provided by OEBS was scanned with trenches of varying depths from 350 µm down to 25 µm. Although the printing plate had little texture, the system was able to reconstruct the surface shape.
Second, a test banknote provided by OEBS with the likeness of painter Gustav Klimt was examined, which has various security features, including intaglio printing. In particular, the area around the eye of Klimt was imaged at a speed of 7 mm/s. The height of the intaglio on the eyeball could be accurately measured at 57 µm. Thus, this system is perfectly suited for rapid safety verification of very small details. To prove that the system is also capable of working at a speed of 12 mm/s, a central line of the Klimt banknote, which has a similar quality and similar details, was captured at this speed.
New developments such as these are constantly expanding the areas of application of ICI methods for quality inspection and security control: For example, the technology from AIT is also being used in electronics manufacturing, in the production of photovoltaic panels, in battery production or in packaging printing, among other applications.
About the AIT Center for Vision, Automation & Control
Center for Vision, Automation & Control (VAC) at the AIT Austrian Institute of Technologie - the largest Research and Technology Organization (RTO) in Austria - is a research unit that uses the possibilities of automation and digitalization to initiate and drive innovations for industry. The focus is on the entire chain "from sensor to decission": This involves the acquisition of information by (imaging) sensor systems via sensor fusion, the combination of physically based models with machine learning and data analysis concepts, the use of this information in fault detection and isolation, optimization and control, and finally cognitive decisions for autonomous systems.


